Installation
To get started with MetaMaskMetaMask A popular Ethereum wallet and browser extension for interacting with dApps., head over to the official metamask.io website or directly to the Chrome Web Store. After verifying that you are on the authentic site, click the install button for your browser. Once the extension is installed, pin it to your navigation bar for quick access.

The first time you use it, you will be prompted to create a new walletWallet A tool used to store, send, and receive cryptocurrencies. or import an existing one. To create a new wallet, you will need to set a strong password to unlock your wallet. MetaMask will then present you with a 12-word recovery phrase that is crucial to store securely, ideally on paper and never in digital format.
Validating your recovery phrase is a mandatory step. MetaMask will ask you to rearrange the words in the correct order to confirm that you have saved them correctly. This step is essential because this phrase is your only way to recover your wallet in case you lose access.
Navigation and Interface
MetaMask’s main interface consists of several essential elements. At the top, you’ll find the network selector that lets you switch between Ethereum and other supported networks. Your public addressAddress A unique string of characters that identifies an entity or account on a blockchain network, allowing the sending and receiving of cryptocurrencies. is displayed just below, with the option to quickly copy it. If you don’t know what an address is, we have an article for you.
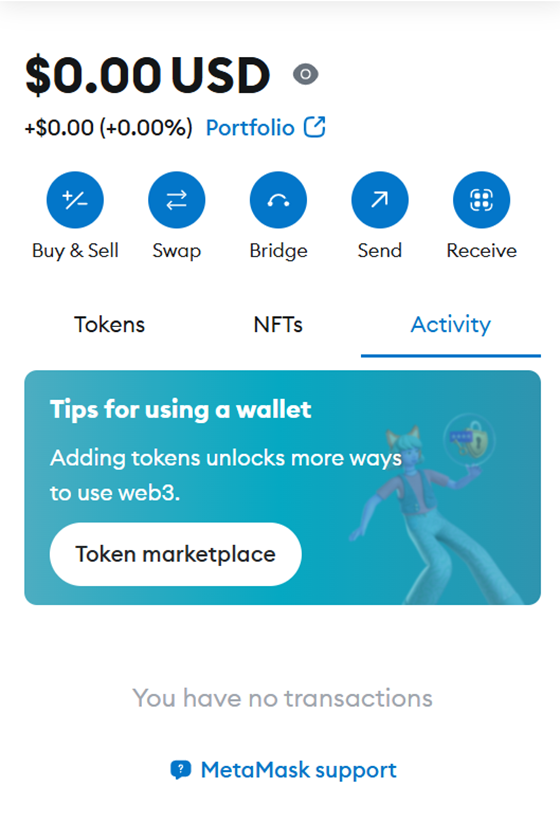
The central area displays your main ETH balance as well as your other tokens. The Buy button allows you to purchase cryptocurrencies directly through MetaMask partners. The Send and Exchange buttons allow you to transfer and exchange tokens respectively.
MetaMask settings are accessible via the icon at the top right. This section allows you to manage your accounts, site connections, custom networks, and general preferences like display currency or gas estimates.
AssetAsset Any digital asset, including cryptocurrencies. Management
Managing tokens in MetaMask starts with adding them to your interface. For standard tokens, MetaMask often detects them automatically. To manually add a tokenToken A digital asset issued on a blockchain, representing various utilities, rights, or value., use the “Import Tokens” feature and enter the token’s contract address. Always verify that you are adding the correct token by comparing the contract address with trusted sources.
To receive cryptocurrencies, simply share your MetaMask public address. You can copy it directly from the interface or view the corresponding QR code. Always make sure you are on the correct network before receiving funds.
Sending cryptocurrencies requires special attention. Start by selecting the right network, then click “Send”. Enter the recipient’s address carefully, check the amount and token you are sending. MetaMask will show you an estimate of the gas fee, which you can adjust according to your transaction speed needs.
Network Management
MetaMask allows you to interact with many EVM-compatible networks. The Ethereum mainnetMainnet The main blockchain network where real transactions take place, as opposed to a testnet used for experimentation. is configured by default, but you can add other popular networks like Polygon, BNB Smart Chain, or Avalanche. To add a new network, use the “Add Network” function in the settings.
Setting up a new network requires several pieces of information: the network name, RPC URL, chain ID, native currency symbol, and blockBlock A fundamental element of a blockchain, containing a set of transactions. explorer. This information is usually available on the official websites of the networks concerned. Always make sure you are using reliable sources for this data.
MetaMask also makes it easy to manage gas fees across different networks. Each network has its own specificities in terms of costs and transaction speed. Adjust your gas settings based on the network used and the urgency of your transactions.
Interaction with DApps
Using decentralized applications with MetaMask is simple but requires vigilance. When a site requests to connect to your wallet, MetaMask displays a confirmation window detailing the permissions requested. Read these permissions carefully before accepting the connection.
Message signatures are common in the Web3 ecosystem. MetaMask clearly displays the content of the message to be signed and its origin. Take the time to read and understand what you are signing. A signature can authorize future actions on your assets, so it is crucial to be vigilant.
For smart contractSmart Contract A self-executing contract with the terms directly written into code on a blockchain. interactions, MetaMask shows you a detailed overview of the transaction. Always check the amount, tokens involved, and gas fees. If something seems unusual, take some time to understand before confirming.
SecuritySecurity The measures and technologies used to protect blockchain networks and assets from theft, fraud, and attacks.
Security in MetaMask is multi-layered. The first is your password that unlocks the extension. The second is your recovery phrase, which should never be shared or stored digitally. Also, enable automatic logout after a period of inactivity in the settings.
Managing website connections is important for your security. Regularly review the list of connected sites in Settings and disconnect those you no longer use. Also review the spending authorizations granted to different contracts and revoke those that are no longer necessary.
If you suspect a compromise, act quickly. Immediately create a new wallet and transfer your funds. Never reuse a recovery phrase that could be compromised. MetaMask also offers a quick lock feature in case of emergency.
Optimization and Maintenance
For optimal use of MetaMask, perform some maintenance operations regularly. Update the extension as soon as a new version is available. Clean your transaction history and your connections to sites. Check and adjust your default gas settings according to the evolution of the networks.
Customizing your MetaMask experience involves several settings. Set your preferred currency for displaying amounts, organize your accounts with meaningful names, and configure the networks you use most frequently. These small adjustments will make your daily use more fluid and efficient.